The material from this book is used on our site by permission of Sterling Publishing Co., Inc. We wish to express our thanks to them for their kindness. In addition to the following text, we also have images which are representative of "hobo art".
An abbreviated description of making whimseys, chains, and balls-in-cages:
 1. Left to right demonstrates the various steps of carving in the development of a combination ball-in-the-cage and chain.
2. Notching decorative cross-grain grooves with the pocketknife. [Not shown]
3. Preliminary stages in the carving of an unusual eight-sided triangular ball-in-cage project. Here the knife is cutting with the grain to establish the inside outline of the triangular-shaped cage. [Not shown]
The best woods to use for whittling are cedar, soft white or sugar pine, and basswood. They should be smooth and straight-grained. After you have worked with wood for a while, you will develop your own preferences and may even eventually acquire a preference for the harder woods. The wood must be soft enough so that it won't crack yet strong enough to hold once you have cut away a major portion of it.
Walking sticks made from chestnut or willow branches with designs carved in the bark such as these, are ideal practice projects for the would-be hobo art whittler. Simply knife-cut through the bark and peel it away. Notice the simple ring patterns and elementary designs.
DIRECTIONS for making a ball-in-cage.
Diagrams 1 and 2 of starting a ball-in-cage.
Diagrams 3 and 4 of continuing a ball-in-cage.
You may use any length and diameter of wood you desire. For example, We are using a block which is 3 1/2" square and 3" long.
1. Starting 1/2" from each end, mark the design with pencil on all four sides as in Diagram 1. Cut the shaded portions clear through so that your block looks like Diagram 2.
2. You will now be working with section (A) Diagram 2, an enlargement of which is shown in Diagram 3. Cut as indicated by the dotted lines, freeing the central portion and leaving a bar along each corner connecting the two ends, Work carefully between the bars and round off the ends and sides of the center block to form a ball; see Diagram 4.
Variations: Try making the cage longer and place two balls inside or make your side bars in a spiral shape.
DIRECTIONS for making a sliding joint with a ball-in-cage.
diagram of a sliding joint
1. After completing the ball-in-the-cage on page 26, you may want to try this technique. For this project, use a square 5" length of soft wood.
2: Draw the design on the wood; see Diagram 2. Remove all the (A) sections. You will have very little room to work between the eight bars.
3. Carve the individual bars. Your cage should look like Diagram 3. For a more intricate shape, leave a ball inside as in Diagram 4.
Carve off the corners, making the wood eight-sided as in Diagram 1. Make sure all sides are equal in width.
DIRECTIONS for making a chain.
diagrams 1 and 2 of starting a chain.
diagrams 3 - 10 of continuing a chain.
For the chain, you will need a 5/x" square, straight-grain
stick, any length you wish, For the beginner, a 6"-8"
length would work best.
1. Following the dotted lines in Diagram 1, cut away the four wooden
strips from the corners, leaving the stick in a cross shape. (Cutting the lines in Diagram 2 in a diamond shape will give you wider links.)
2. Mark off the first link on the prepared stick as in Diagram 3. (Links that are 1/2 times the width of the stick are a good proportion.) Mark only the two opposite sides for the first link. Cut a small V-shaped groove along your mark IA to B); see Diagram
4. Repeat on the opposite side.
3. At the halfway mark of the first link on the alternate sides (C), cut V-shaped grooves as in Step 2. Repeat with the other side; see Diagram 5 ID). Cut away the shaded portion (E). Your stick should now look like Diagram 6.
4. Mark your first link along the dotted line on both sides as shown in Diagram 7, Cut away the shaded portion on both sides and your stick will look like Diagram 8. Repeat with second link, allowing your link to hang loose as in Diagram 9. Continue making as many links as you wish, being careful not to crush the links you have
made.
5. Trim the corners and round off the links; see Diagram 10.
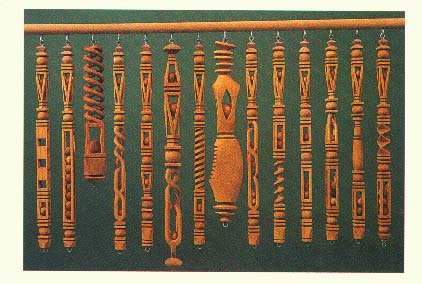
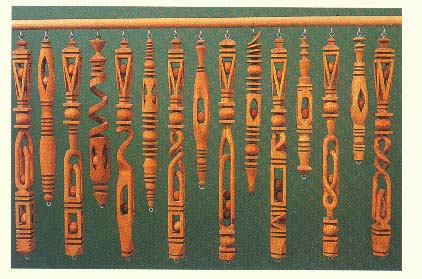
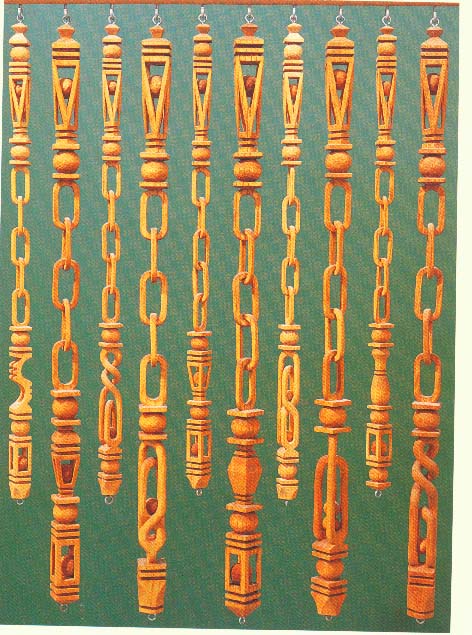
You may view some images of representative work here: Image 1. ... Image 2. ... Image 3. ... Image 4.
Hobo and Tramp Art Carving is no longer in print. You may be able to find a copy at a used bookstore or on eBay.
 Comments:
Artisans: Matt Lippa or Elizabeth Schaaf
(256) 886-2809 (9AM - 5PM Central Time Only please.)
Copyright © Artisans. All Rights Reserved.